This guide is just one example of how you can export sensor data from an EpiSensor gateway and store it in a Microsoft SQL Server Database. We will use FileZilla Server to receive the CSV files via FTP, then save the files to a folder on the server. Following that, we will use a PowerShell script to work through the files and upload each data point to the database on our SQL Server. This allows you to store your sensor data locally behind your firewall and ensure that it is safe and secure on premises.
First, create a destination folder for the incoming CSV files to be stored and later processed, in this example we will use C:\PlantRoomGateway as the destination. Ensure you have the correct permissions set on the folder to allow FileZilla read/write and later the user you will run the PowerShell script as.
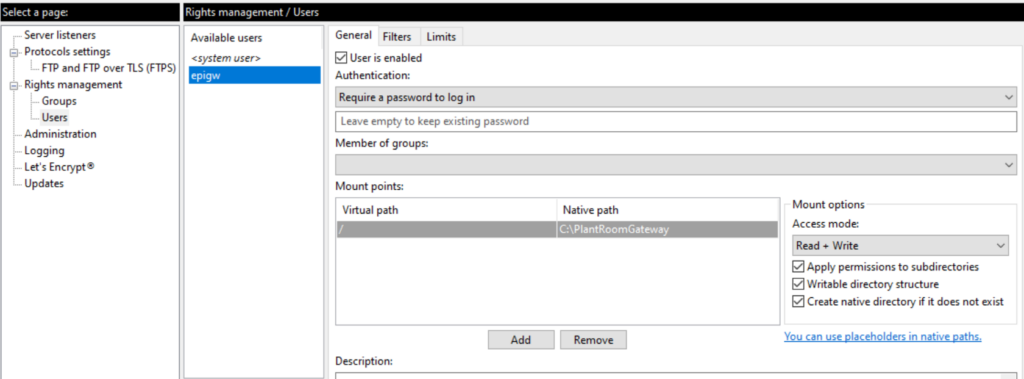
Install and configure Filezilla server to accept incoming FTP transfers from the gateway. If you don’t already have FileZilla Server, you can download it from their website here. Once installed, edit the settings within FileZilla and create a suitable user and set their Native path to the folder you created above this will ensure that FileZilla saves the CSV files to the root, e.g. C:\PlantRoomGateway.
 Upon the first run, our PowerShell script will create the other required sub folders inside this root folder:
- logs – this folder will store logs from each time the script processes a file
- processed – once a file has been successfully processed the script will move it to this directory, once there are 1000 or more, the script will compress the files into one Zip file, which will also be stored here.
- quarantine – if any files fail to get processed successfully, they will be moved to this folder for investigation by a user at a later date.
Ensure you have the correct permissions set on this folder so FileZilla can write to it, and later our PowerShell script can read from and write to it.
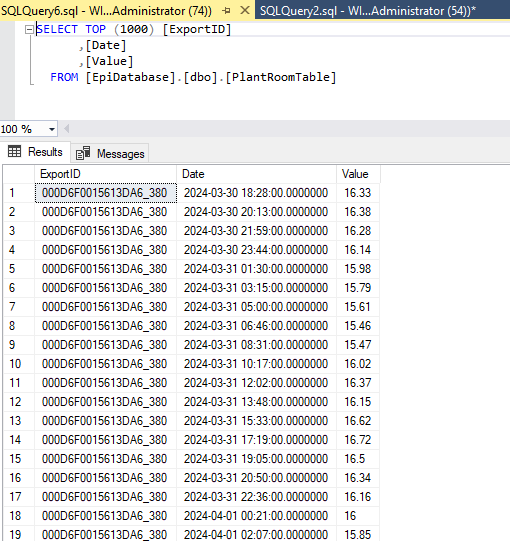
Create a suitable user on your SQL server instance with correct permissions to insert into the table in the database where you will be storing the data. The table schema should have the following columns ExportID, Date, Value. You may name the database and table whatever you want, remember to update the values in the script before running it.
Next create a new PowerShell script called ImportData.ps1 and add the below code to the file, changing the following:
- The target directory path
- Database server name
- Database name
- Table name
- User ID
- Password
$csvPath = "C:\path\to\your\file.csv"

$databaseServer = "YourDatabaseServer"

$databaseName = "YourDatabaseName"

$tableName = "YourTableName"

$userId = "YourDBUserId"

$password = "YourDBPassword"

# Reading the CSV file

$data = Import-Csv -Path $csvPath

# Database connection string

$connectionString = "Server=$databaseServer;Database=$databaseName;User Id=$userId;Password=$password;"

foreach ($row in $data) {

$exportID = $row.ExportID

$date = $row.Date

$value = $row.Value

# SQL query to insert data

$query = "INSERT INTO $tableName (ExportID, Date, Value) VALUES ('$exportID', '$date', $value)"

# Execute SQL query

Invoke-Sqlcmd -Query $query -ConnectionString $connectionString

}
Note: you will need to enable SQL server login under Server authentication for your SQL server instance to allow the user in the script to login.
Save the file, and then open up Task Scheduler. Then create a new scheduled task with an appropriate name, e.g. ImportGatewayCSVfiles.
Set up the task as follows:
- Under the “Actions” tab, create a new action to “Start a program”
- For “Program/script”, enter powershell.exe
- In the “Add arguments (optional)” field, enter -File “C:\path\to\your\script.ps1”. Make sure the path points to where you saved the above PowerShell script
- Configure the trigger according to when you want the script to run. For example, every 30 minutes
- Save the task
Once the exported CSV files start to appear in the C:\PlantRoomGateway directory the script should run and insert them into the database, based on the schedule you set up in the Scheduled Task you created.
Related Questions
Learn more about the application of IoT to Energy Management and Demand Response.